Tuesday, December 13, 2011

Lou Mai Kai 糯米鸡


Lou Mai Kai is a popular Dim Sum dish and it is actually steamed glutinous rice topped with marinated chicken and mushrooms.

Lou Mai Kai is one of my favorite Dim Sum dish and I always complaint that the ones found in Singapore is not as nice as those in Malaysia because it seems that those in Singapore are factory made whereas Malaysia are home made. Singapore ones are lighter in color, light brown while Malaysia ones are dark brown. Heavier in oyster and dark sauce flavor which suits my taste more.

Marinating all the seasoning to the chicken
Ingredients:
2 Chicken Thigh
300g of Glutinous Rice
3 Pieces of Chinese Dried Mushroom (soaked and sliced)
3 Gloves of Garlic (cut into small pieces)
2 Pieces of Chinese Sausages (optional)

Seasoning: (chicken)
1 tsp Five Spiced Powder
2 tsp Dark Sauce
2 tbsp Oyster Sauce
2 tsp Dark Sweet Sauce
Pinch of Salt

Seasoning: (Glutinous Rice)
1/2 cube of chicken stock
Dark Sauce

Directions:

Preparations:
Marinate the chicken with all the seasons and leave it for at least 2 hours
Soak the glutinous rice in water for 4 hours
Soak the mushroom in a bowl of water till soft (approx 1 hour)
Slicing of the mushroom
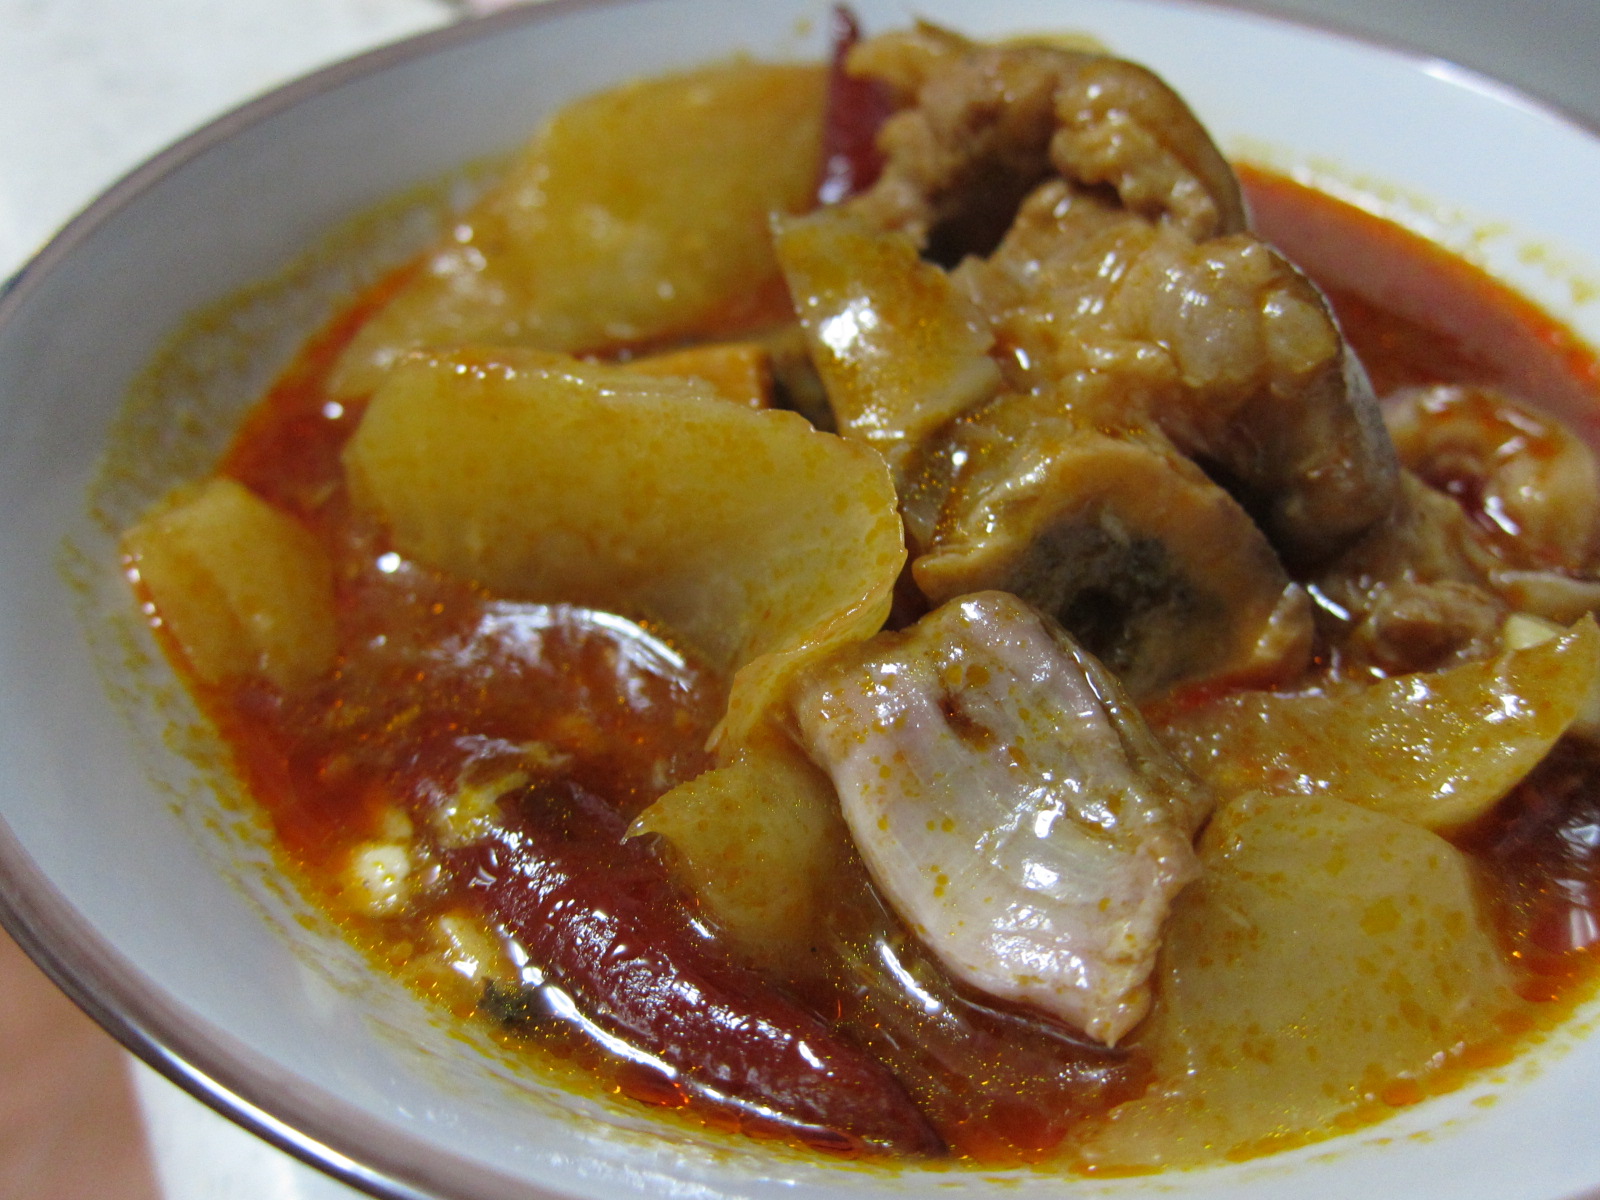
Simmer the chicken for approx. 15~20 mins
1. Heat up wok with oil under medium heat
2. Sauteed the garlic till light brown
3. Place the marinated chicken in the wok and stir fried under high heat
4. Add in the mushroom
5. Add in water to simmer the chicken for approximately 15 to 20 minutes
6. Get a large flat bowl and placed the cooked chicken in it. (Spread it across the bowl evenly)
7. Add in the glutinous rice into the wok and stir around with the remnants sauce around the wok
8. Add in chicken stock and black sauce and stir evenly
9. After 3 mins, scoop up the rice and place it on top of the chicken inside the flat bowl
10. Add some water till it forms a thin layer of water above the rice
Steam the bowl for 30 mins
Fill a big wok with water and place the bowl inside to steam it for 30 mins.
Scoop up and serve! For photo shot purpose, I scoop it in a small bowl                                                    

Hope you will enjoy this dish as much as I do~!

Friday, November 18, 2011

Pork Trotters with Radish (Hakka Style)

Braised Pork Trotters Hakka Style
My dad told me that this dish was taught to him by my late grandma (mother side) and the tomato sauce based pork trotters is uncommon compare to those black vinegar that you can find in the hawker center. Personally for me, I am not a big fan of vinegar hence, this dish beats the latter hands down!!

Besides that, my siblings and me have been eating this since we were kids and it is an all time favorite for ALL of us especially my brothers!! I have this rare opportunity to witness my dad cooking this dish recently and I was quick to snap up some pics and not forgetting the recipe for this wonderful dish! It is a pretty easy dish and the ingredients are easily available at your nearest supermarket.


Ingredients:
2 White Radish
A handful of Dried Chillies (as shown on the picture above)
8 to 9 Shallots
500g of Pork Trotters
8 tbsp of Tomato Sauce
2 Bowls of Water (around 1000ml)
3 tbsp of Oil

Directions:

1. Prepare a big pot and pour in some oil under medium heat
2. Pour in the pork trotters, shallots and dried chillies and stir fry till the pork's surfaces turn golden brown.
3. Add in the water
4. Add in the tomato sauce and let it simmer for 30 minutes under low heat.
5. Finally, add in the radish and let it simmer for another 90 minutes or until the meat turn soft and radish is soft at the outside but crunchy in the inside.
6. Dish out and serve!! (Easy right?!!)

Succulent pork.. Yummy~!

Wednesday, October 26, 2011

Braised Pork Bellies with Tofu and Egg

Looks like kway chap too!!
If you are a fan of pork bellies, this mouth watering dish will certainly win you over! And the best thing is it is very easy to prepare and it goes well with rice!!
Star Anise
One of the main seasoning that is used for this dish is star anise and five spice powder (五香粉).  Star anise is normally used in slow cooked dishes that characterize Eastern Chinese cuisines. And coincidentally, the five spice powder we are using for this dish contains star anise in it as well. Be careful not to put too much of the spice blend into your dish as the food gets bitter if too much of it is being used. Both of these seasoning are easily available in either Chinese drug store or dry good shop.

Ingredients: (For 4~5 person)
500gram of Pork Bellies (pan fried first - optional)
5 ~ 6 pieces of Tofu (sliced)
6 Hard Boiled Eggs
1 liter of Water (use stock if possible, it will enhance the taste of the whole dish!)
Caixin (pan fried with garlic)
Can choose to add in meat balls, fried bean curd or even pig intestine.

The seasoning
Seasoning: (rough estimation, do taste it to adjust to your taste preference)
4~5 cloves of Garlic
6~7 slices of Ginger
1 and a half tsp of Five Spice Powder (五香粉)
2 tsp of Sugar
1 tsp of Salt
4 pieces of Star Anise
2 tbsp of Black sauce

Once you have all the ingredients needed, you are ready to cook!!
Directions:
1.Heat up a pot under low heat and put in the sugar. (beware not to burn the sugar, it will turn to black color)
2. Melt the sugar until it turn brown.
3. Add in water/stock.
4. Add in the remaining of the seasoning and turn on high heat.
5. Taste the sauce and add in salt accordingly to your liking.
6. Let it boil before adding in the pork bellies.
7. Add in the tofu thereafter and follow by the eggs.
8. Let it simmer under low heat for around 90 mins to 120 mins depending how soft you want your pork bellies to be.
9. If you prefer the sauce to be thicker, add in some corn flour mixture (mix with water).
10. Scoop up and topped up with some cooked Caixin at the side.
Serve with plain white rice~~!! Yumeee~!!


This dish goes very well with the special chili sauce that was prepared by my dad which is quite similar to those you eat with beef noodles. I will be featuring the recipe for that chili sauce soon!!

Sunday, October 23, 2011

Penang Assam Laksa (Cooking)

 Directions:
Ginger, torch ginger & Lemongrass
All the spices grinned
Spice Paste:
Pound or grind all ingredients into a fine paste preferably with a food processor or blender.
Add in the water to ensure that the paste is ground efficiently.
Heat up wok without oil and cook the spice paste for about 4 ~ 5 mins until fragrant.
Set aside to cool.

Assam Laksa Soup:
Boil the fish in a big pot
Boil the water in high heat and cook the fish in it.
Remove the fish when it is cook. ( Roughly around 15 ~ 20mins)
Allow the fish to cool and remove the flesh from the bones.
Return the fish bones and simmer for another 20 mins.
Add in the spice paste into the soup.
Add in assam, laksa leaves, and prawn paste.
Add in salt and sugar to taste.
Reduce to low heat and let it simmer for another 30 mins.
Lastly, add in the fish and bring it to boil again. (remember to break the fish to smaller pieces)

Separate the meat from the bones
Noodles:
Blanch the vermicelli in hot boiling water for 7~ 10 mins.

Garnishes are nicely sliced!
Assembly:
Place a serving of vermicelli in a bowl
Spread garnishes on top of the bowl depending on your preferences
Add in the soup (make sure the soup must be hot!)
Squeeze in lime juice
Top up with a spoon or two of Heh Ko according to taste
Serve~!!
Add another tbsp on heh ko to complete your bowl of assam laksa!

Thursday, October 20, 2011

Penang Assam Laksa

Home Cook Penang Assam Laksa
Assam laksa which originates from Penang, a small town in Malaysia is not like those ordinary laksa you find in Singapore which uses coconut milk. It uses tamarind (assam) to give this bowl of noodle the distinctive sweet and sour taste with a hinge of spiciness. It is healthier too in the sense that it also uses fresh fruits and vegetables like pineapples, cucumbers, onions and mint leaves / laksa leaves (aka Polygonum leaves) as garnishing.

Ikan Kembong (Mackeral)
One of main ingredients for this bowl of noodle is the fish. Various fishes are used in making Assam Laksa such as Wolf-herring, Mackeral and Shad. According to my mum, the authentic fish for Assam Laksa is Ikan Kembong which is Mackeral.

Cooking a bowl of Assam Laksa is quite a task because there it requires lots of preparation work for the ingredients and some are not easy available in our nearest FairPrice or even wet market.

So, I was pretty excited when my mum told me she will be cooking Assam Laksa for the family and there I am with my camera and notebook taking down all the important points for this delicious bowl of noodle!

Ingredients: Serves 4 to 5
(all the measurements are rough estimations, you can gauge according to how you prefer your bowl of Assam Laksa taste like)

Thick Rice Vermicelli
Noodles:
1.5kg of thick rice vermicelli
Belacan

 Spice Paste:
20~ 25 Dried chillies
3~5 Chilli Padis
2 tbsp of Belacan
4 stalks of Lemongrass
3 stalks of Torch Ginger
1 small piece of Ginger
3 Shallots
3 cloves of Garlic
200ml of Water (for the paste to be ground efficiently)
Assam

Garnishes:
1 Cucumber (thinly sliced)
3 Onions (thinly sliced)
1/2 Small Pineapple, preferably ripped (cubed)
10 Limes (sliced at the top)
4 tbsp of Heh Ko (prawn paste), 1 tbsp for a bowl
4 petals of Mint Leaves (thinly sliced)
A handful of Lettuce (thinly sliced)
4 petals of Laksa Leaves

Lemon Grass & Torch Ginger
Soup:
1kg of Mackeral, including the bones
3 litres of Water
6 large stalks of Laksa Leaves (Polygonum)
4 pieces of Assam phoi (Tamarind)
3 tbsp of Heh Ko (prawn paste)
3 tbsp of Sugar
2 tbsp of Salt to taste

Continue to my part 2 of my Penang Assam Laksa...

Friday, September 23, 2011

Braised Pork Ribs in Black Bean (Teochew Style)

Braised Pork!!
Braised pork ribs is one of my all time favorite dish cooked by my dad. Yes, Aaron's dad can cook too! A pretty cook as well and I learnt a lot from him.

This is a pretty simple dish and I think there is a bit of "TeoChew" (a Chinese dialect) style in it because my dad is a TeoChew. I have this chance to cook this dish with my dad recently and I would like to share with you all and I bet you will love it as I do!! =)

Ingredients:
Pork Ribs (1kg)
3 Chilli Padis or Dried Chillies (depending on how spicy you like it)
750ml to 1000ml of water
1 Tsp Corn Starch (to thicken the gravy)

Black Beans
Plum Sauce
Seasoning:
2 Tbsp Oyster Sauce
1 Tbsp Plum Sauce
1 Tbsp "Sweet" Sauce (甜酱)
1 Tsp of Black Beans (crushed)
1 Tsp of Black Beans Sauce

Oyster sauce
Directions:
1. Marinate the pork with all seasonings and keep it aside for an hour.
2. Pour in water and chillies and let it boil under high heat.
3. Once it starts boiling, reduce to low fire.
4. Add water if necessary.
5. Let it boils for an hour or until the meat turn soft. (If you are using pressure cooker it will be much faster)
6. Add corn starch and stir.
7. Garnish with coriander leaves (optional) and serve!!

This is really a simple dish and you can try using chicken (preferably breast meat) too!! Enjoy~!!

Monday, August 22, 2011

Chinese Spinach in Superior Stock (上汤苋菜)

This soup base Chinese Spinach is a popular dish which uses 3 different types of eggs (century egg, salted egg and the egg white), fried anchovies as toppings on top of the Spinach.

This dish is one of my favorite vegetable dish when I eat out at Cze Char shop because of its unique flavor and its also partly a soup dish as well so its like ordering 2 dishes in 1! Cost savings!!

I am proud to say that I didn't refer to any recipe from the internet nor did I ask anyone for any tips on how to cook this dish. So, the style of cooking is uniquely Aaron's style. =)

Ingredients:
A bunch of Chinese Spinach

Stock:
300ml of water
A handful of dried anchovies (rinsed)
5~ 6 cloves of Garlic (fried in oil)
Dried Scallops (optional)

Toppings:
1 century egg (cubes)
1 salted egg (cubes) (boil the egg in boiling water for roughly 4~5mins)
2 eggs white
A handful of wolfberries
A handful of anchovies (fried till crispy)

Directions:
Making the soup/stock:
1. Bring the water to boil in a pot in high heat.
2. Once the water starts to boil, put in the dried anchovies and fried garlic cubes.
3. Turn to low heat and let it slow boil for roughly 30mins.
4. Add salt to taste.
5. Turn off heat after 30mins.

Steaming of the vegetables:
1. Place the Chinese Spinach in a deep plate.
2. Pour the soup/stock over the vegetables.
3. Sprinkle the cubed century egg, salted egg and wolfberries over the vegetables.
4. Place the plate in a wok with roughly 500ml (2 big bowls) for steaming.
5. Place the plate in the wok and steam it for 15mins.
6. Pour in the egg white over the vegetables and close the lid for 5 mins.
7. Sprinkle the fried anchovies over it and serve!!

Monday, June 6, 2011

Fried French Beans with Mushrooms and Prawns

Ever wonder how you can cook a tasty plate of greens with zero amount of unhealthy MSG but yet full with flavor? The key is add in lots of other ingredients like mushrooms, prawns, dried shrimps, garlic and lastly chilli padi!! With all the natural flavor coming out from the ingredients, your plate of greens won't taste bland and you wouldn't have to add in any MSG; just a pinch of salt will do!!

Ingredients (for 2 ~3 pax):
A handful of French Beans (thinly sliced)
5 pieces of prawns (de-shell and de-vein)
1 packet of Golden Mushroom, aka Enoki Mushroom
3 gloves of garlic (sliced)
1 tbsp of dried shrimps (washed and drain off water)
2 chilli padi (optional)
A pinch of salt
1 tbsp of oil

Seasoning for the prawns
1 tsp Corn flour
1/2 tbsp Oyster sauce
Pinch of Salt

Directions:
1. Heat up wok with oil under medium oil, once oil is hot add in garlic.
2. Continue to saute till the garlic turn light golden brown and add in the dried shrimps.
3. Once u can smell the fragrance of the dried shrimps, pour in the marinated prawns and turn to high heat.
4. When the prawns turn pink, add in french beans and mushroom.
5. Continue to stir fry for a good 3 to 5 minutes and you can add in the chilli padi if you prefer some spiciness in your dish! To me, is a must!!
6. Heat off and serve!!

A healthy plate of greens with lots of nutrients pack in it!
I love the dish as the french beans were very crunchy and the prawns contains the fresh flavor of the veg and mushroom in it!! Not forgetting the chilli padi that added some spiciness to the dish!! Love it!! =)

Thursday, May 5, 2011

Creamy Butter Prawns

My first encounter with creamy butter was at Seafood Paradise located at Singapore Flyer a few years ago. The signature dish there is their "Creamy Butter Crab" and it is really really good!! If you never tried it before, you should really give it a try but.... the pricing is on the high side. It can cost you up to $100 for 2 person with dishes like a crab, a vege and another main (chicken, prawns or beef).

After browsing thru a few recipes regarding creamy butter, I decided to give it a try because I find that it is rather similar to the Cereal Prawns that I've cook earlier on.

Ingredients: (serves 2)
12 prawns
2 cloves of garlic (chopped) 
Butter
2 stalks of curry leaves
1 tbsp of sugar
1 chilli padi (cut)
1 cup of evaporated milk (preferbably full cream)
1 tsp of tapoica flour (for thickening of the sauce)
Oil for frying

Seasoning:
Salt
Black pepper
2 tsp Oyster sauce
3/4 tbsp Plain Flour

Directions:
Remove shell and devien prawns
Season it with a pinch of salt and black pepper
Add 2 tsp of oyster sauce
Sprinkle 1 tbsp of plain flour
Mix well and set aside for 10 mins

Heat wok under high heat and pour in oil
Once oil is hot, pour in prawns and fry for a minute until the prawns turn pinkish
Scoop up the prawns and drain off excess oil

Heat up wok under medium fire and put in butter
Put in garlic and stir fry till golden brown
Put in the curry leaves and chilli padi and continue to stir
Add in the prawns and stir fry for a minute
Pour in evaporated milk and let it simmer for a minute
Add in one tbsp of sugar and continue to let it simmer
Mix the tapoica flour with some water and pour it in (according to how thick you want your prawns to be)
Heat off and ready to serve!!


This is no doubt one of the best dish that I've cooked so far!! 2 thumbs up!! There is nothing much that I would change for my recipe but if I am going to cook it again, I will make sure I cook 20 of them!!

Saturday, April 30, 2011

Cereal Prawns 麦片虾

Cereal prawns is one of a favorite dish among prawn lovers, this dish is available at most Cze Char stall in Singapore or Malaysia and a plate of it and cost up to $25SGD (maybe around 10 prawns only)!! Yeap, it is not a cheap dish and for me, I only ordered it when there is a big group of us eating or for a specific celebration or when there is someone is the group who loves eating prawns!!

Personally, I think that the dish is overpriced and that is why I decided to give this dish a run for its money! It is the second time I am cooking this dish and the first was a failure and that is why I didn't post it. I shall share with u my learning's and the end of this post.

You will be amaze that the ingredients for this dish is really simple but it is the cooking that requires some skills.

The main ingredients
Ingredients: (Serves 2~3)
12 medium prawns
A handful of curry leaves (around 2 stalks)
3 packets of 3in1 cereal
2 gloves of garlic
1 knob of Butter (40~50gram)
Oil for frying the prawns

Seasoning of prawns:
Salt and black pepper
Tapioca flour

Directions:
Devien the prawns and leaving the shell in-tact
Cut away the front portion of the head of the prawns
Clean the prawns with water
Marinate the prawns and a pinch of salt and black pepper
Coat a light layer of tapioca flour on the prawns
Set aside for 5 to 10 mins

Heat up wok and pour in oil
Deep fry the prawns for roughly 1 min or when you see that the prawns turn pink and crisp
Scoop up the prawns and drain the oil from it
Drain the oil from the fried prawns
Remove the excess oil from the frying of the prawns
Heat up the wok and put in the butter and the garlic
Fry the garlic till light brown and add in the curry leaves
Add in prawns and continue to fry for around 2 to 3 mins until you are able to smell the fragrance of the curry leaves
Turn off heat and pour in the cereal mix and continue to fry until all the prawns are coated with cereals
Dish out and serve!
Tasty!
Overall, my cereal prawns is pretty good but it find that it was rather sweet and that is probably due to the sugar inside the 3in1 cereal packets. So my advice is try to use maybe only 2 packets of the 3in1 and top up more plain cereal or just filter away the creamer and sugar of the 3rd packet of 3in1. And lastly, I will not use tapioca flour to coat my prawns cause it gave the prawns a sticky feeling. I will use corn flour or normal flour on my next try.
I hope you will give this a try cause it is pretty easy and you will feel satisfy knowing that you are able to cook 麦片虾 at home!! And the best thing is, the cost for this dish is less than $10SGD!!

*Note: If you want to add some crisp on your cereal, try pan frying your cereal mix (without oil) before adding it to the prawns.

Saturday, April 2, 2011

Sweet and Sour Chicken

I've never really tried cooking chicken before and being one of the more common poultry eaten, I decided that I should give it a try! I've always been a fan of sweet and sour and I think it is only right that I should start my first try chicken dish with it!!
I will be using Korean miso paste which my sister in law got it from a Korean Supermarket for my sweet and sour sauce. If you don't plan to use this miso paste often, you can try getting one of those individual mini sized packaging miso paste from NTUC supermarket at the Japanese food section. Miso is actually a term use by the Japanese and Korean for fermented soyabean paste. So, if you have those traditional chinese bean paste, you can use those as well!

Ingredients: (serves 2)
2 chicken thighs (cut into small pieces
2 tomatoes
A few slices of ginger (preferably older ginger, tastier)
2 gloves of garlic (chopped into tiny pieces)
Coriander Leaves
1 tbsp of oyster sauce
1/4 cube of chicken stock / salt & pepper
1 tbsp of corn flour
Korean Miso Paste
Oil for frying

Seasoning for sauce:
4 tbsp of ketchup
11/2 tbsp of chili sauce
1 tbsp of sugar
1 tbsp of lime juice
1 tsp of Korean Miso paste
Half bowl of water (approx 300ml)
1 chili padi (cut into small pieces) optional

Directions:
Wash the chicken thigh
Marinate the chicken with oyster sauce and corn flour
Add in chicken stock or salt and pepper
Mix well and set aside for 15 minutes

Put all seasoning in a bowl
Mix well and set aside

Heat up wok with oil over medium fire
Once oil is hot, put in garlic and fry till golden brown (beware not to over fry the garlic, as it will taste bitter)
Add in ginger and continue to stir fry
Pour in the chicken and fry chicken till it turn golden brown (probably a good 8~10 minutes)
Add the combined seasoning, tomatoes and let it simmer for another 8~10 minutes (add water if gravy starts to thicken)
Increase the heat and stir well for one last time
Dish out and garnish with coriander leaves (if you don't like the smell of coriander, you can leave it out)
Serve with rice!!
The end product!!
Hmm... It turn out that my first try on cooking chicken was not successful and I was pretty disappointed with the dish. The sauce was good but the taste of the chicken was disappointing. I didn't do a good job is making sure the chicken was well cooked cause the meat was still too soft and there was still traces of blood when I bit off the meat from the bone. I should have use more oil to fry the chicken until it is really golden brown and then drain off the oil before adding in the seasoning. 
Besides that, I would not use chicken stock to marinate the chicken next time because the taste of the chicken stock didn't go well with the sweet and sour sauce. Salt and pepper would be good enough. And lastly, put more GINGER!! It will taste better! 
I hope my sharing on the outcome of my recipe will stop you from doing the same mistake as me. Aaron still can cook, just that he had a bad day... Will do better next time!! =)

Thursday, March 31, 2011

Dumpling in Ikan Billis (Anchovies) Soup

I enjoy making dumplings and making your own dumplings has its benefits. For example, you can choose what type of ingredients you would like to have and what not to. For myself, I prefer to have some mushrooms and prawns as part of my ingredients as it enhances the texture and the flavor of my dumplings!! And besides putting water chestnuts to for the crunchy feel, I like to add in carrots as well because carrots are healthy stuff!

carrots, water-chestnuts and mushrooms
Ingredients: (22 dumplings)
Dumpling Skin
1 Skinless Breast Meat / Minced Meat (Pork or Chicken)
12 Prawns (De-shell, de-vein and cut into small pieces)
Half Carrot (Cubed)
4 Water Chestnuts (Cubed)
3 pieces of medium sized Mushrooms

this dumpling skin wasn't really good
Seasoning:
4 tsp Oyster Sauce
Salt & Pepper
1 Egg White
Corn Starch

Ikan Billis (Anchovies) soup:
Fried anchovies
2 stalks of Cai Xin
1 bowls of water (approx. 500ml) 

Garnishing:
Green Onions / Coriander leaves
Fried onions and garlic

Directions:

Making the dumpling:
Mash the chicken breast using the back of your cleaver till the meat turn soft (you can skip this step if you are using minced meat but a friend once told me that minced meat are not healthy as the meat use are not fresh and you have no idea which part of the meat were used to mince it)
Mix all the ingredients into a bowl
Add in seasoning and mix the ingredients evenly
Scoop a small amount (roughly 11/2 tsp) of the mixture on a dumpling skin
Wrap the dumpling by applying a thin layer of egg york on the edge of the dumpling skin in order for the skin to stick against each other
Continue to do so until you either run out of dumpling skin or meat

Boiling of soup:
Bring a pot of water (approx. 500ml) to boil
avoid putting too much filling
Pour in a handful of fried ikan billis
Let it simmer in low heat for 20 minutes
Add a pinch of salt
Add in 5~7 dumplings
Add in Cai Xin
Close the the wok with a lid and let the dumpling cook for 7 minutes
Once you notice that the dumplings are floating, it's a sign that the dumplings are cooked!!
Dish out into a bowl
Garnish the soup with some coriander, fried onions and garlic
Serve!!


The meat of my dumpling was not tender and fragrant enough and that is probably because I didn't a good job pounding the breast meat and marinating it. Even so, I still thoroughly enjoyed the dumplings and wished you are able to share it with me. =)

Monday, March 28, 2011

Fried Ikan Billis (Anchovies)

Ever wonder how you can prepare a good bowl of soup in 25 minutes without using MSG or those ikan billis or chicken stock?? Well, Aaron going to teach you how and you will be surprise that how easy it is to cook!

Anchovies have plenty of health benefits that are valuable to people of all ages. They are rich in calcium, protein, Vitamin D and Vitamin E as well. It is said that three tablespoons of anchovies will give you about 180mg of calcium, which is about one-fifth of an adult's daily calcium requirement. You can read more about the health benefits of anchovies here http://hubpages.com/hub/Health-Benefits-of-Anchovies.

Here are the ingredients: (serves 2)
A handful of anchovies
Oil (4~5 tbsp)

You might need a small air tight container to store the fried ikan billis like the one shown in my picture on the left.

Directions:
Wash and soak the anchovies (as the dried variety has high salt content)
Dry it using a paper towel (If you need it to dry at a faster pace, heat up the wok without putting any oil and dry it using the heat of the wok)
Heat up the wok and pour in the oil
Once the oil is hot, place all anchovies into the wok and fry it
Reduce the heat as you don't want to over fry the anchovies
Once the anchovies turn to golden brown and crispy, remove and drain the oil from it
Cool and store in bottle

Note: Try not to store it for too long (not more than 3 days) as the the oil in the fried anchovies will spoil the taste.


You can use these fried anchovies to boil soup or as a topping on your fried rice, noodle or you can even eat it on its own. If you are planning to use it as a topping up, it is best to use those that are freshly fried rather than those that you stored in container. For me, I used it (half the amount in the container) for my noodle soup by boiling the anchovies for a good 15~20 minutes and putting in all my favorite ingredients. And when the noodle was done, I put some on top my noodles as well.
The soup was really sweet and it has all the natural goodness of the anchovies packed in it. The additional fried anchovies made my noodle more tasty as well! Stay tune for my next post where I will show you how you can prepare a simple noodle soup using these fried anchovies. =)
Nothing left!!
Related Posts Plugin for WordPress, Blogger...